Setup Guide
Complete guide to install and configure ESPectre with ESPHome.
Choose one of the two installation methods below:
| Method | Best for | Tools |
|---|---|---|
| Option A | End users, quick setup | Chrome + ESPConnect |
| Option B | Developers, customization | Python + ESPHome CLI |
Option A: Web Flash (no coding required)
What You Need
Hardware: - ESP32 board with CSI support: - ✅ Tested: ESP32-S3, ESP32-C6, ESP32-C5, ESP32-C3, ESP32 (original) - ⚠️ Experimental: ESP32-S2 - USB cable (USB-C or Micro-USB, depending on your board) - Wi-Fi router (2.4 GHz, 802.11b/g/n/ax)
Software: - Google Chrome browser (required for Web Serial API)
1. Download Firmware
Go to Releases and download the .bin file for your chip (e.g., espectre-2.5.0-esp32c6.bin).
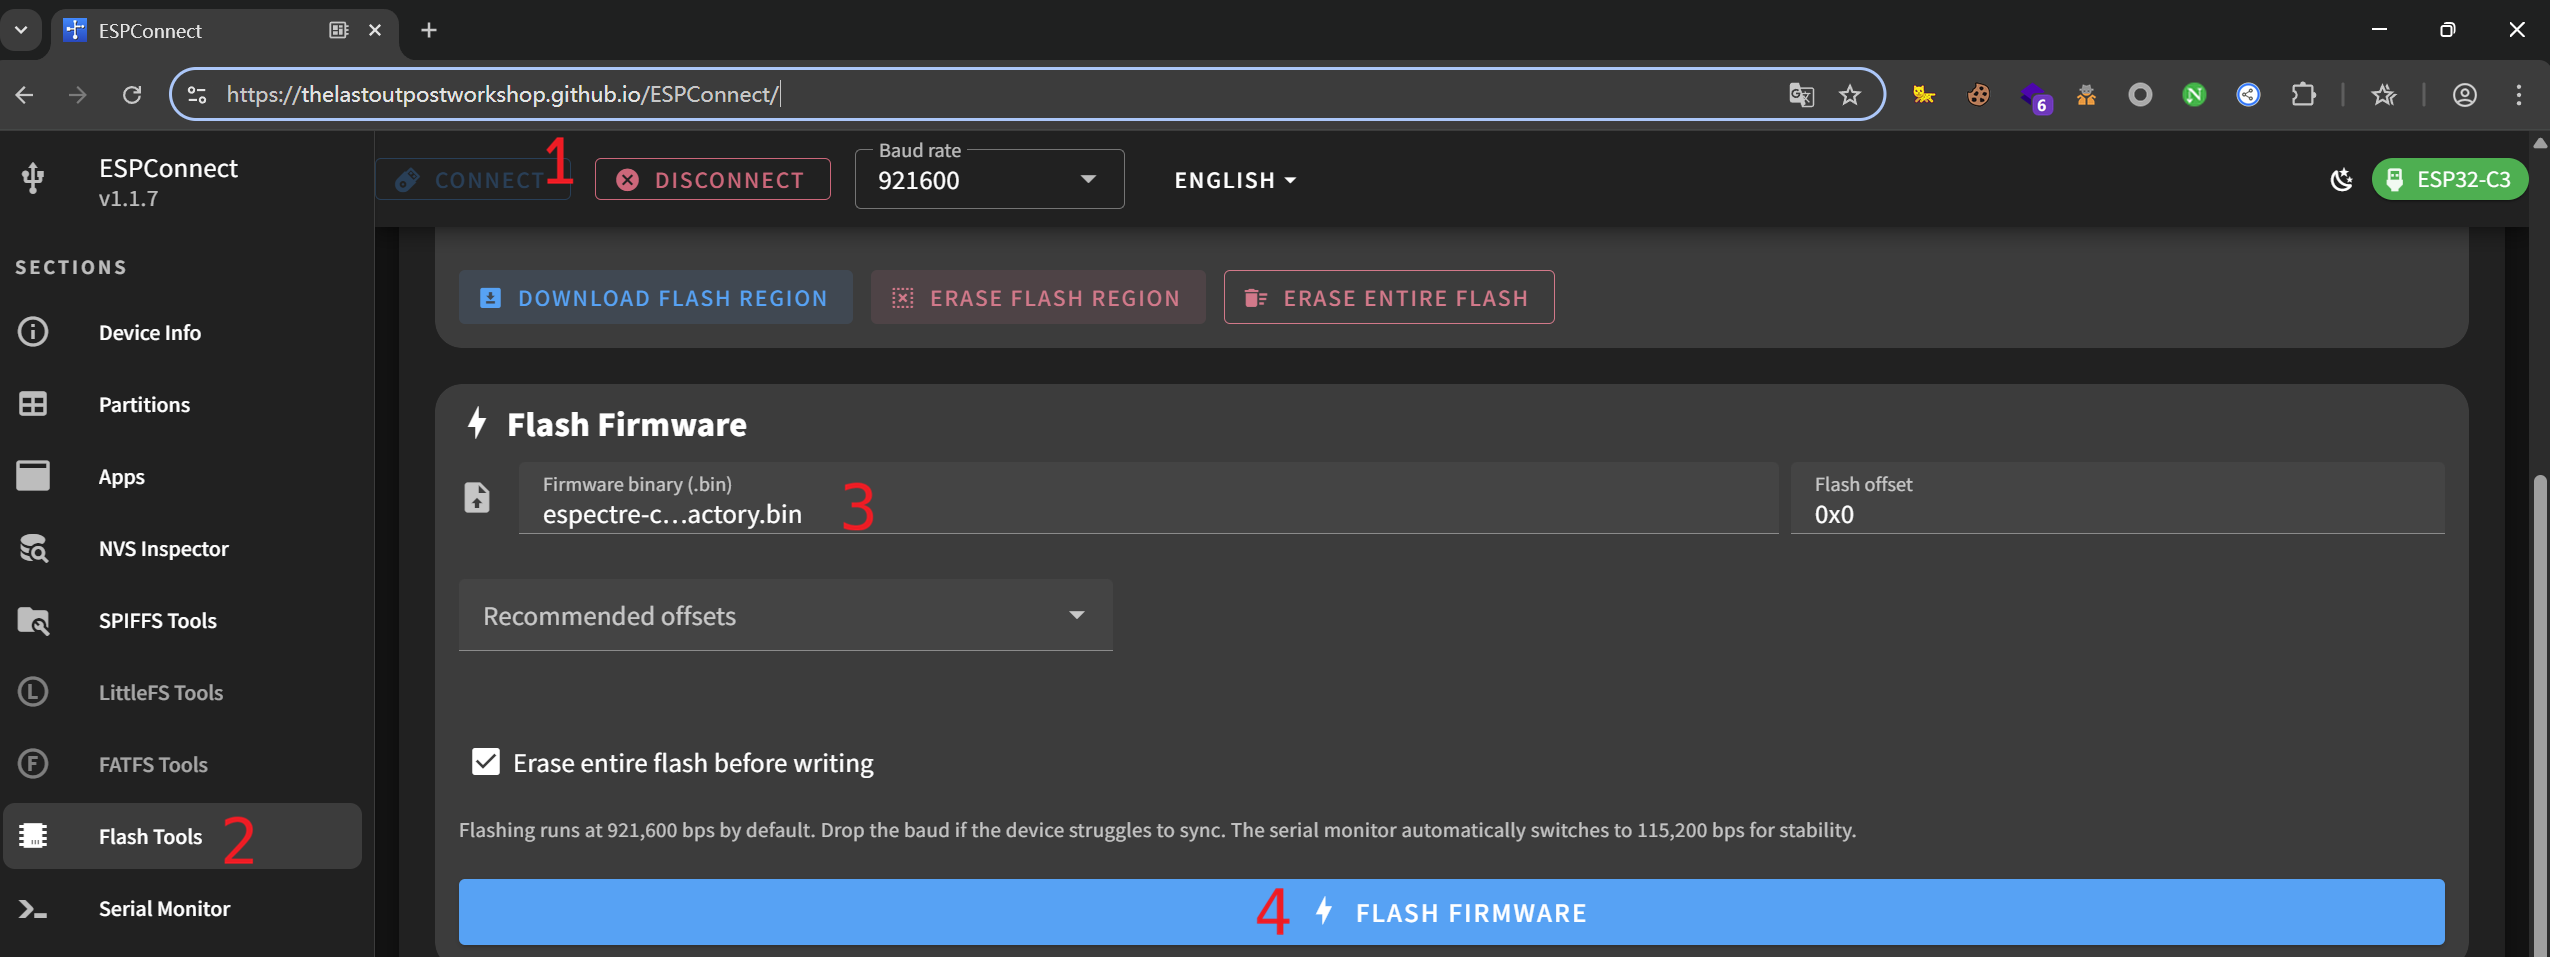
2. Flash Firmware
- Open ESPConnect in Chrome
- Connect your ESP32 via USB
- Click Connect and select the serial port
- Select the
.binfile you downloaded - Click Flash
3. Configure WiFi
After flashing, configure WiFi using one of these methods:
| Method | How |
|---|---|
| BLE (easiest) | Use ESPHome or Home Assistant Companion app |
| USB | Go to web.esphome.io → Connect → Configure WiFi |
| Captive Portal | Connect to "ESPectre Fallback" WiFi → Configure in browser |
That's it! The device will be automatically discovered by Home Assistant.
Option B: ESPHome CLI (for developers)
What You Need
Hardware: Same as Easy Install above.
Software: - Python 3.12 (⚠️ Python 3.14 has known issues with ESPHome) - ESPHome 2024.x or newer - Home Assistant (recommended, but optional)
1. Install ESPHome
# Create virtual environment (recommended)
python3 -m venv venv
source venv/bin/activate  # On macOS/Linux
# venv\Scripts\activate   # On Windows

# Install ESPHome
pip install esphome
2. Download a configuration file
Download the example configuration for your hardware:
| Platform | Configuration File | CPU | WiFi Chip | PSRAM | Status |
|---|---|---|---|---|---|
| ESP32-C6 | espectre-c6.yaml | RISC-V @ 160MHz | WiFi 6 capable | ❌ | ✅ Tested |
| ESP32-S3 | espectre-s3.yaml | Xtensa @ 240MHz | WiFi 4 | ✅ 8MB | ✅ Tested |
| ESP32-C3 | espectre-c3.yaml | RISC-V @ 160MHz | WiFi 4 | ❌ | ✅ Tested ² |
| ESP32 | espectre-esp32.yaml | Xtensa @ 240MHz | WiFi 4 | Optional | ✅ Tested ³ |
| ESP32-C5 | espectre-c5.yaml | RISC-V @ 240MHz | WiFi 6 capable | ❌ | ✅ Tested ¹ |
| ESP32-S2 | espectre-s2.yaml | Xtensa @ 240MHz | WiFi 4 | Optional | ⚠️ Experimental |
Note: ESPectre uses WiFi 4 (802.11b/g/n) mode for stable 64 subcarriers and faster calibration, even on WiFi 6 capable chips (C5, C6). This ensures consistent performance across all platforms.
On ESP32-C5, ESPectre also forces
2.4 GHz onlyband mode at runtime to avoid unintended 5 GHz association and keep CSI behavior stable.
Recommendations: - ESP32-C6: Modern RISC-V platform, good performance, compact form factor - ESP32-S3: Best for advanced applications, future ML features (more memory) - ESP32-C3: Budget-friendly option, compact form factor
These files are pre-configured to download the component automatically from GitHub.
⚠️ Experimental platform: ESP32-S2 has CSI support but has not been extensively tested. Please report your results on GitHub Discussions!
¹ ESP32-C5:
improv_serial(USB provisioning) not yet supported by ESPHome. Use BLE or WiFi AP provisioning instead.³ ESP32 (original/WROOM-32): AGC/FFT gain lock is not available on this platform. Band calibration works but CSI amplitudes may have more variance than newer chips.
⁴ Boards with USB-UART bridges (CH340, CP2102, CH343): If you don't see logs after flashing, use the UART configurations in
examples/uart/which enable logging on UART0.
3. Build and flash
esphome run espectre-c6.yaml # replace with your platform's file
4. Configure WiFi
After flashing, configure WiFi using one of these methods:
| Method | How |
|---|---|
| BLE (easiest) | Use ESPHome app or Home Assistant Companion app |
| USB | Go to web.esphome.io → Connect → Configure WiFi |
| Captive Portal | Connect to "ESPectre Fallback" WiFi → Configure in browser |
That's it! The device will be automatically discovered by Home Assistant.
Development Setup
For development, contributions, or offline use, use the pre-configured development files.
1. Clone the repository
git clone https://github.com/francescopace/espectre.git
cd espectre
2. Install ESPHome
python3 -m venv venv
source venv/bin/activate  # On macOS/Linux
pip install esphome
3. Create secrets file
cat > examples/secrets.yaml << EOF
wifi_ssid: "YourWiFiName"
wifi_password: "YourWiFiPassword"
# Optional: lock to specific AP (useful for mesh networks)
# wifi_bssid: "AA:BB:CC:DD:EE:FF"
EOF
4. Build and flash
Use the development configuration files (with debug sensors and local component path):
| Platform | Development File |
|---|---|
| ESP32-C6 | examples/espectre-c6-dev.yaml |
| ESP32-C5 | examples/espectre-c5-dev.yaml |
| ESP32-S3 | examples/espectre-s3-dev.yaml |
| ESP32-C3 | examples/espectre-c3-dev.yaml |
| ESP32 | examples/espectre-esp32-dev.yaml |
# For ESP32-C6
esphome run examples/espectre-c6-dev.yaml

# For ESP32-S3
esphome run examples/espectre-s3-dev.yaml

# For ESP32 (original)
esphome run examples/espectre-esp32-dev.yaml
Development vs Production Files
| File | Component Source | WiFi | Logger | Debug Sensors |
|---|---|---|---|---|
espectre-c6.yaml |
GitHub | Provisioning (BLE/USB/AP) | INFO | ❌ |
espectre-c6-dev.yaml |
Local | secrets.yaml | DEBUG | ✅ |
espectre-s3.yaml |
GitHub | Provisioning (BLE/USB/AP) | INFO | ❌ |
espectre-s3-dev.yaml |
Local | secrets.yaml | DEBUG | ✅ |
espectre-esp32.yaml |
GitHub | Provisioning (BLE/USB/AP) | INFO | ❌ |
espectre-esp32-dev.yaml |
Local | secrets.yaml | DEBUG | ✅ |
Docker / Home Assistant Add-on
If you run ESPHome in Docker or as a Home Assistant add-on, just download an example file to your config directory.
Example for Docker with bind mount:
# Your docker-compose.yml mounts /home/user/esphome/config:/config
cd /home/user/esphome/config

# Download the configuration file
curl -O https://raw.githubusercontent.com/francescopace/espectre/main/examples/espectre-c6.yaml

# Run ESPHome
docker compose exec esphome esphome run espectre-c6.yaml

# After flashing, configure WiFi via BLE, USB, or Captive Portal
No need to copy any files manually - the component is downloaded automatically from GitHub!
Configuration Parameters
ESPectre Component
All parameters can be adjusted in the YAML file under the espectre: section:
| Parameter | Type | Default | Description |
|---|---|---|---|
detection_algorithm |
string | mvs | Detection algorithm: mvs (variance) or ml (neural network) |
traffic_generator_rate |
int | 100 | Packets/sec for CSI generation (0-1000, 0=disabled) |
traffic_generator_mode |
string | dns | Traffic generator mode: dns (UDP queries) or ping (ICMP) |
publish_interval |
int | auto | Packets between sensor updates (default: same as traffic_generator_rate, or 100 if traffic is 0) |
segmentation_threshold |
string/float | auto | Threshold: auto, min, or number (0.0-10.0 for both MVS and ML) |
segmentation_window_size |
int | 75 | Moving variance window in packets (10-200) |
selected_subcarriers |
list | auto | Fixed subcarriers (omit for auto-calibration) |
lowpass_enabled |
bool | false | Enable low-pass filter for noise reduction (MVS and ML) |
lowpass_cutoff |
float | 11.0 | Low-pass filter cutoff frequency in Hz (5-20) |
hampel_enabled |
bool | false | Enable Hampel outlier filter (MVS and ML) |
hampel_window |
int | 7 | Hampel filter window size (3-11) |
hampel_threshold |
float | 4.0 | Hampel filter sensitivity (MAD multiplier) (1.0-10.0) |
gain_lock |
string | auto | AGC/FFT gain lock: auto, enabled, disabled |
For detailed parameter tuning (ranges, recommended values, troubleshooting), see TUNING.md.
Choosing Detection Algorithm
| Algorithm | How It Works | Pros | Cons | Best For |
|---|---|---|---|---|
| MVS (default) | Variance of spatial turbulence | Low CPU, adaptive threshold | Requires 10s NBVI calibration | General use |
| ML | Neural network (MLP 12→16→8→1) | Fast boot (~3s), no calibration | Pre-trained weights, fixed subcarriers | Experimental |
Both algorithms support optional low-pass and Hampel filters on the turbulence stream.
espectre:
  detection_algorithm: mvs  # or ml
Threshold ranges (unified for both algorithms):
- Range: 0.0 - 10.0
- MVS default: auto (adaptive based on baseline noise)
- ML default: 5.0 (equivalent to 0.5 probability)
Integrated Sensors (Created Automatically)
All sensors are created automatically when the espectre component is configured. You can optionally customize their names.
| Sensor Config | Type | Default Name | Description |
|---|---|---|---|
movement_sensor |
sensor | "Movement Score" | Current motion intensity value |
motion_sensor |
binary_sensor | "Motion Detected" | Motion state (on/off) |
threshold_number |
number | "Threshold" | Detection threshold (adjustable from HA) |
calibrate_switch |
switch | "Calibrate" | Trigger band recalibration (ON during calibration) |
Customizing Sensors
All sensor entities support standard ESPHome options:
| Option | Type | Description |
|---|---|---|
name |
string | Custom entity name |
internal |
bool | If true, hide from Home Assistant (still processes data) |
icon |
string | Custom MDI icon (e.g., mdi:motion-sensor) |
disabled_by_default |
bool | Entity disabled until manually enabled in HA |
The movement_sensor also supports ESPHome sensor filters for data transformation.
Common filters:
| Filter | Example | Description |
|---|---|---|
multiply |
multiply: 100 |
Scale values (e.g., 0-1 → 0-100) |
round |
round: 1 |
Round to N decimal places |
clamp |
min_value: 0, max_value: 100 |
Limit value range |
offset |
offset: -0.5 |
Add/subtract constant |
sliding_window_moving_average |
window_size: 5 |
Smooth noisy readings |
See the ESPHome sensor filters documentation for the complete list.
Example:
espectre:
  movement_sensor:
    name: "Living Room Movement"
    internal: true              # Hide from Home Assistant
    icon: "mdi:sine-wave"
    filters:
      - multiply: 100           # Scale 0-1 to 0-100
      - clamp:
          min_value: 0
          max_value: 100        # Cap at 100%
      - round: 1                # Round to 1 decimal
  motion_sensor:
    name: "Living Room Motion"
    icon: "mdi:motion-sensor"
  threshold_number:
    name: "Living Room Threshold"
Tip: Use
internal: trueonmovement_sensorto reduce data sent to Home Assistant while keepingmotion_sensorfor automations.
Home Assistant Integration
ESPHome provides automatic Home Assistant integration. Once the device is flashed and connected to WiFi:
- Home Assistant will automatically discover the device
- Go to Settings → Devices & Services → ESPHome
- Click Configure on the discovered device
- All sensors will be automatically added
Entities Created
Entity names are based on the device name in your YAML (default: espectre):
- binary_sensor.espectre_motion_detected - Motion state (on/off)
- sensor.espectre_movement_score - Movement intensity value
- number.espectre_threshold - Detection threshold (adjustable from Home Assistant)
- switch.espectre_calibrate - Trigger recalibration (ON during calibration)
Note: If you change the device name, replace
espectrewith your device name in automations and dashboards.
Automation Example
automation:
  - alias: "Turn on light on motion"
    trigger:
      - platform: state
        entity_id: binary_sensor.espectre_motion_detected
        to: "on"
    action:
      - service: light.turn_on
        target:
          entity_id: light.living_room

  - alias: "Turn off light after no motion"
    trigger:
      - platform: state
        entity_id: binary_sensor.espectre_motion_detected
        to: "off"
        for:
          minutes: 5
    action:
      - service: light.turn_off
        target:
          entity_id: light.living_room
Inactivity alert:
automation:
  - alias: "Inactivity Alert"
    trigger:
      - platform: state
        entity_id: binary_sensor.espectre_motion_detected
        to: "off"
        for:
          hours: 4
    condition:
      - condition: time
        after: "08:00:00"
        before: "22:00:00"
    action:
      - service: notify.mobile_app
        data:
          message: "No movement detected for 4 hours"
Dashboard Examples
Two dashboard examples are available:
| Dashboard | Description |
|---|---|
| home-assistant-dashboard.yaml | Production dashboard with motion sensors |
| home-assistant-dashboard-dev.yaml | Development dashboard with debug sensors (Free Heap, Loop Time, etc.) |
How to use: 1. Go to Settings → Dashboards → Add Dashboard 2. Open the new dashboard and click Edit (pencil icon) 3. Click the three dots menu → Raw configuration editor 4. Replace ALL content with the YAML from the file (delete the default content first) 5. Click Save
Note: If you changed the device name from
espectre, replace all occurrences ofespectre_with your device name (e.g.,espectre_living_room_).⚠️ Multiple devices? If you uncommented
name_add_mac_suffix: truein your YAML, entity names will include the MAC suffix (e.g.,sensor.espectre_a1b2c3_movement_score). Update the dashboard entities accordingly.
Production dashboard includes: - Gauge: Visual representation of movement score with color-coded severity - Motion tile: Current motion state with last changed time - Threshold control: Adjustable detection threshold - History graph: 24-hour view of movement and threshold
Development dashboard adds: - Free Heap: Available memory (monitor for leaks) - Max Free Block: Largest contiguous memory block - Loop Time: Main loop execution time
Traffic Generator
The traffic generator creates network packets that trigger CSI callbacks from the WiFi driver. Default rate is 100 pps (packets per second).
⚠️ Important: The traffic generator runs continuously while the device is powered on, not just during calibration. Each ESPectre device constantly sends packets to generate CSI data for motion detection. See Network Impact below to understand the bandwidth and airtime implications for your WiFi network.
espectre:
  traffic_generator_rate: 100  # packets per second (0-1000)
  traffic_generator_mode: dns  # dns (default) or ping
Traffic Generator Mode
Two modes are available:
| Mode | Protocol | Description |
|---|---|---|
dns |
UDP | Sends DNS queries to gateway:53. Works with most routers. (default) |
ping |
ICMP | Sends ICMP echo requests to gateway. Alternative if DNS doesn't work. |
Both modes generate minimal network traffic (<20 bytes per packet).
Choosing a mode:
- Start with dns (default) - works with most home routers
- Try ping if you get low packet rates - some routers don't respond to root domain DNS queries
- Note: some routers/firewalls may rate-limit or block ICMP ping responses
espectre:
  traffic_generator_rate: 100
  traffic_generator_mode: ping  # Use ICMP ping instead of DNS
Community test results (thanks to @gasment):
| Board | Antenna | Mode | Rate | RSSI | AGC | Result |
|---|---|---|---|---|---|---|
| ESP32-S3-N16R8 | built-in | DNS | 100 | -15±5 | 15±5 | ✅ |
| ESP32-S3-N16R8 | built-in | PING | 100 | -15±5 | 10±5 | ✅ |
| ESP32-S3-N16R8 | external | DNS | 100 | -10±5 | 5±5 | ✅ |
| ESP32-S3-N16R8 | external | PING | 100 | -5±5 | 5±5 | ✅ |
| ESP32-C6 Super Mini | built-in | DNS | 100 | -20±5 | 15±5 | ✅ |
| ESP32-C6 Super Mini | built-in | PING | 100 | -20±5 | 15±5 | ✅ |
| ESP32-C3 Core | built-in | DNS | 94 | -20±5 | 15±5 | ✅ |
| ESP32-C3 Core | built-in | PING | 94 | -20±5 | 15±5 | ✅ |
Both modes work reliably across different boards and antenna configurations.
For detailed rate recommendations and Nyquist-Shannon sampling theory, see TUNING.md.
Network Impact
Each ESPectre device generates continuous WiFi traffic as long as it's powered on. This is required for motion detection to work. Here's the approximate impact per device:
| Rate | Packets/sec | Approximate Bandwidth |
|---|---|---|
| 50 pps | 50 | ~4.5 KB/s |
| 100 pps (default) | 100 | ~9 KB/s |
| 200 pps | 200 | ~18 KB/s |
For single devices or small deployments (< 5 devices), the default 100 pps has negligible impact on most home networks (typically <1% of available bandwidth).
⚠️ Planning a large deployment? With many ESPectre devices, the cumulative traffic can consume noticeable WiFi airtime. For example, 10 devices at 100 pps each = 2000 packets/sec (1000 requests + 1000 responses), using approximately 10-15% of airtime. Consider using External Traffic Mode with UDP broadcast to reduce this to ~0.5% airtime.
External Traffic Mode
You can disable the internal traffic generator and rely on external WiFi traffic:
espectre:
  traffic_generator_rate: 0      # Disable internal generator
  publish_interval: 100          # Publish sensors every 100 packets
This is useful when: - You have multiple ESPectre devices and want to reduce total network traffic - You already have continuous WiFi traffic on your network - You want centralized control over traffic generation
Generating external traffic:
When traffic_generator_rate: 0, ESPectre opens a UDP listener on port 5555. Send UDP packets to this port to generate CSI data.
Use the standalone Python script: espectre_traffic_generator.py
Configuration: Edit the script and set your device IP(s):
TARGETS = ['192.168.1.255']  # Broadcast address (recommended for multiple devices)
# TARGETS = ['192.168.1.100', '192.168.1.101']  # Or list specific device IPs
PORT = 5555
RATE = 100  # packets per second (recommended: 100)
⚠️ ESP32 (original) limitation: The CSI driver on ESP32 has a known issue where it doesn't detect traffic that was already flowing when CSI was enabled. You must start the external traffic generator after the ESP32 connects to WiFi. Additionally, broadcast mode is not supported - use unicast (specific device IP) instead. ESP32-C3, ESP32-C5, ESP32-C6, and ESP32-S3 don't have these limitations. See espressif/esp-csi#247 for details.
Usage:
python3 espectre_traffic_generator.py run      # Foreground (Ctrl+C to stop)
python3 espectre_traffic_generator.py start    # Background daemon
python3 espectre_traffic_generator.py stop     # Stop daemon
python3 espectre_traffic_generator.py status   # Check if running
Home Assistant (Docker) note:
The script starts the background process using subprocess.Popen (no fork()), which avoids the deprecation warning emitted by Python in multi-threaded Home Assistant environments.
Run on any device on the network: Raspberry Pi, NAS, Home Assistant server, etc.
Home Assistant integration:
Copy the script to /config/python_scripts/espectre_traffic_generator.py and add to configuration.yaml (see command_line integration docs):
command_line:
  - switch:
      name: "ESPectre Traffic Generator"
      command_on: "python3 /config/python_scripts/espectre_traffic_generator.py start"
      command_off: "python3 /config/python_scripts/espectre_traffic_generator.py stop"
      command_state: "python3 /config/python_scripts/espectre_traffic_generator.py status"
      value_template: '{{ "Running" in value }}'
      unique_id: espectre_traffic_generator
This creates a switch.espectre_traffic_generator entity you can toggle from dashboards or use in automations.
Why UDP instead of ping?
You might wonder why we don't just use `ping -b` (broadcast ping) for external traffic. While ping works for CSI generation, UDP has significant advantages: | Aspect | Ping broadcast | UDP broadcast | |--------|----------------|---------------| | Response traffic | Yes (ICMP Echo Reply from each device) | None | | Network overhead | N+1 packets (1 request + N replies) | 1 packet | | Root required | Yes (for broadcast and high-rate) | No | For 10 devices at 100 pps, ping broadcast generates 1100 packets/sec (100 requests + 1000 replies), while UDP broadcast generates only 100 packets/sec total.Network Impact: Internal vs External Traffic
Packet sizes by mode:
| Mode | Payload | IP packet | On-wire (with MAC) |
|---|---|---|---|
| DNS (default) | 17 bytes | 45 bytes | ~75 bytes |
| Ping | 8 bytes | 28 bytes | ~58 bytes |
| External UDP | 3 bytes | 31 bytes | ~61 bytes |
On-wire size includes WiFi MAC header (~30 bytes). Actual size varies with encryption and PHY rate.
Comparison for 10 devices at 100 pps:
| Approach | Total packets/sec | Total airtime |
|---|---|---|
| Internal traffic generator (DNS) | 1000 + 1000 replies | ~14% |
| Internal traffic generator (Ping) | 1000 + 1000 replies | ~11% |
| UDP broadcast (recommended) | 100 | ~0.5% |
UDP broadcast is the most efficient option for multi-device deployments: one packet reaches all devices, with no response traffic.
What is airtime?
Airtime is the percentage of time the WiFi channel is occupied by transmissions. Since WiFi is a shared medium, only one device can transmit at a time. Each packet occupies the channel for: - **Transmission time**: packet size / PHY rate (e.g., 60 bytes at 54 Mbps ≈ 9 µs) - **Protocol overhead**: preamble, inter-frame spacing, ACK (~40 µs) At 100 pps with ~50 µs per packet: **airtime = 0.5%** High airtime (>30-50%) causes network congestion, increased latency, and packet loss. The UDP broadcast approach keeps airtime minimal even with many ESPectre devices.Auto-Calibration (MVS only)
⚠️ CRITICAL: The room must be still during the first 10 seconds after boot. Movement during calibration will result in poor detection accuracy!
Auto-calibration applies only to MVS mode. ML mode uses fixed subcarriers from pre-trained weights and skips this phase.
ESPectre automatically calibrates in two phases:
- Gain Lock (~3 seconds, 300 packets): Stabilizes AGC/FFT for consistent amplitudes
- NBVI Band Calibration (~7.5 seconds, 10 ×
window_sizepackets): Selects optimal 12-subcarrier band and calculates adaptive threshold
With default segmentation_window_size: 75, the calibration collects 750 packets. If you change the window size, the calibration buffer adjusts automatically.
Room must be quiet during the entire ~10 second calibration.
Sensor placement: Position the sensor 3-8 meters from your access point for optimal performance. See Sensor Placement in the Tuning Guide for details.
Gain lock modes: The gain_lock parameter (auto/enabled/disabled) controls AGC stabilization. See Gain Lock in the Tuning Guide.
Runtime recalibration: You can trigger recalibration from Home Assistant using the Calibrate switch (switch.espectre_calibrate). The switch is automatically disabled during calibration to prevent accidental interruption. For a complete reset, erase flash and re-flash.
Custom Hardware Configuration
ESPectre now provides example configurations for all ESP32 variants with CSI support. If you need to customize further, use these guidelines:
Automatic sdkconfig options
ESPectre automatically sets all required and recommended sdkconfig options. You don't need to manually configure anything in most cases.
The component automatically configures:
| Option | Value | Purpose |
|---|---|---|
CONFIG_ESP_WIFI_CSI_ENABLED |
y |
Enable CSI (mandatory) |
CONFIG_PM_ENABLE |
n |
Disable power management |
CONFIG_ESP_WIFI_STA_DISCONNECTED_PM_ENABLE |
n |
Disable disconnected PM |
CONFIG_ESP_WIFI_AMPDU_TX_ENABLED |
n |
More CSI callbacks |
CONFIG_ESP_WIFI_AMPDU_RX_ENABLED |
n |
More CSI callbacks |
CONFIG_ESP_WIFI_DYNAMIC_RX_BUFFER_NUM |
128 |
Larger RX buffer |
CONFIG_FREERTOS_HZ |
1000 |
1ms tick for precise timing |
Platform-specific options (optional)
You only need to add sdkconfig options for platform-specific features:
esp32:
  variant: ESP32C6  # or ESP32S3, etc.
  framework:
    type: esp-idf
    version: 5.5.1
    sdkconfig_options:
      # CPU frequency (platform-dependent)
      CONFIG_ESP_DEFAULT_CPU_FREQ_MHZ: "160"  # 160 for C6, 240 for S3

      # PSRAM (if available on your board)
      # CONFIG_ESP32S3_SPIRAM_SUPPORT: y
Reference: For advanced sdkconfig tuning see official Espressif documentation: ESP32 WiFi.
Flash Size and Partitions
Minimum requirement: 4MB flash. ESPectre fits comfortably in 4MB with full OTA support. Larger flash (8MB/16MB) is only useful for additional components (like
bluetooth_proxy) or future ML features planned for v3.x.
ESPectre Flash Footprint
ESPectre itself is very lightweight. The actual code overhead is minimal:
| Configuration | Flash | RAM | Notes |
|---|---|---|---|
| ESPHome base + provisioning | 1,464 KB | 49.9 KB | BLE, captive portal, improv |
| ESPectre production | 1,535 KB | 50.0 KB | Full featured |
| ESPectre overhead | ~70 KB | 88 bytes | Just the CSI code |
The ESPectre component adds only ~70KB of Flash and less than 100 bytes of RAM. The majority of flash usage comes from standard ESPHome components (WiFi, API, OTA, provisioning).
Custom Partition Table
ESPectre includes a custom partition table (partitions.csv) that is automatically applied during compilation. This partition table:
- Supports OTA updates (dual app partitions)
- Includes SPIFFS for calibration buffer (320KB, used during boot only)
- App partition size: ~1.8MB per slot
# ESPectre Partition Table (4MB flash)
# Name,   Type, SubType, Offset,   Size
nvs,      data, nvs,     0x9000,   0x5000
otadata,  data, ota,     0xe000,   0x2000
app0,     app,  ota_0,   0x10000,  0x1D0000   # ~1.8MB
app1,     app,  ota_1,   0x1E0000, 0x1D0000   # ~1.8MB
spiffs,   data, spiffs,  0x3B0000, 0x50000    # 320KB
Combining with Other Components
If you want to add ESPectre to an existing ESPHome configuration with other heavy components, be aware that ESPectre's partition table may override your existing partitions.
To use your own partition table, you can override it in your YAML using an absolute path:
esphome:
  name: my-device
  platformio_options:
    board_build.partitions: /path/to/partitions_custom.csv
Then create the partitions_custom.csv file at that location.
Example for 4MB flash (no OTA, ~3.7MB for app):
# Name,   Type, SubType, Offset,  Size
nvs,      data, nvs,     0x9000,  0x5000,
phy_init, data, phy,     0xe000,  0x1000,
app0,     app,  factory, 0x10000, 0x3C0000,
spiffs,   data, spiffs,  0x3D0000,0x30000,
Example for 8MB flash (no OTA, ~7.7MB for app):
# Name,   Type, SubType, Offset,   Size
nvs,      data, nvs,     0x9000,   0x5000,
phy_init, data, phy,     0xe000,   0x1000,
app0,     app,  factory, 0x10000,  0x7C0000,
spiffs,   data, spiffs,  0x7D0000, 0x30000,
Notes:
- SPIFFS is required. ESPectre uses it as a temporary buffer during calibration. Removing SPIFFS will cause the component to fail during initialization.
- If you remove OTA partitions, you must also remove the ota: section from your YAML (OTA updates won't work without the partitions).
Troubleshooting
WiFi protocol/bandwidth shows "unavailable"
On some targets or band modes, the WiFi driver may not expose protocol/bandwidth values through all read APIs. In this case, ESPectre logs:
WiFi Protocol: unavailable (...)
WiFi Bandwidth: unavailable (...)
This is expected for unsupported read paths and does not necessarily indicate a WiFi connection failure.
CSI packet length warnings (wrong SC count)
ESPectre expects HT20 CSI payloads mapped to 128 bytes (64 subcarriers). Runtime normalization already handles common alternate lengths:
256 -> 128(double HT-LTF / STBC-like packet)228 -> 114 -> 128(double short HT estimate, then remap)114 -> 128(57-subcarrier short HT estimate remapped to 64)
If you still see repeated Filtered ... wrong SC count warnings, packets are likely arriving in another unsupported format. In that case, keep an eye on the logged metadata (ch, bb/sig_mode, est_len) and open an issue with logs and target chip/AP details.
No motion detection
- Verify traffic generator is enabled (
traffic_generator_rate > 0) - Check WiFi is connected (look for IP address in logs)
- Wait for band calibration to complete (~10 seconds after boot)
- Adjust
segmentation_threshold(try 0.5-2.0 for more sensitivity)
False positives
- Increase
segmentation_threshold(try 2.0-5.0) - Check for interference sources (fans, AC, moving curtains)
- Increase
segmentation_window_sizefor more stable detection
Calibration fails (MVS only)
Applies only when detector_algorithm: mvs (default). The ml detector does not use NBVI calibration.
- Ensure room is quiet during calibration (first 10 seconds after boot)
- Check traffic generator is running
- Verify WiFi connection is stable
Note: If band selection fails, the system automatically falls back to default subcarriers [11-22] with a default threshold of 1.0. Motion detection will work but may be less optimal. Look for the log message ⚠ Fallback calibration: using default subcarriers.
SPIFFS partition not found
If you see SPIFFS partition could not be found in logs, ESPectre's partition table was not applied correctly. This commonly happens when:
- Combining ESPectre with other components like
bluetooth_proxyoresp32_ble_tracker - Using a custom YAML instead of the provided examples
- Another component is overriding the partition table
Solution:
-
First, try a full flash erase and reflash:
bash
   # Erase flash completely (replace /dev/ttyUSB0 with your port)
   esptool.py --port /dev/ttyUSB0 erase_flash
   # Then reflash
   esphome run your-config.yaml
Or use the ESPHome dashboard: click the three dots menu → "Install" → "Erase device before installing". -
If the problem persists, create a custom partition table that includes SPIFFS. See the "Combining with Other Components" section above for examples.
Unstable detection with mesh networks
If you have a mesh WiFi network, the sensor may roam between access points causing CSI inconsistencies. Lock it to a specific AP using the BSSID.
For development files (espectre-*-dev.yaml):
1. Add wifi_bssid to your secrets.yaml:
yaml
   wifi_bssid: "AA:BB:CC:DD:EE:FF"
2. Uncomment the bssid line in your config file:
yaml
   wifi:
     networks:
       - ssid: !secret wifi_ssid
         password: !secret wifi_password
         bssid: !secret wifi_bssid
For production files (espectre-*.yaml with provisioning):
Add the BSSID directly after configuring WiFi, or use the ESPHome dashboard to edit the configuration.
To find your AP's BSSID: - Check your router's admin page - Use a WiFi analyzer app on your phone - Look in ESPectre logs after connection (shows connected BSSID)
ESP32-C3 Super Mini issues
If you're using an ESP32-C3 Super Mini (popular budget boards from AliExpress/Temu):
-
No logs visible via USB: ESPHome defaults to native USB Serial/JTAG on C3, but boards with external USB-UART bridges (like CH343, CP2102) need explicit UART0 configuration. Add this to your YAML:
yaml logger: hardware_uart: UART0 -
Calibration takes very long or fails: Set
traffic_generator_rate: 94or lower. Values of 95+ cause calibration to hang for 90+ minutes. -
Flash fails or board doesn't respond: Some cheap clones don't support QIO flash mode. Add this to your YAML:
yaml
   esphome:
     platformio_options:
       board_build.flash_mode: dio
Flash failed
- Hold BOOT button on ESP32
- Press RESET button
- Release BOOT button
- Run flash command again
View logs
# Via USB
esphome logs <your-config>.yaml

# Via network (after first flash)
esphome logs <your-config>.yaml --device espectre.local
Next Steps
- Tuning Guide: TUNING.md - Optimize for your environment
- Main Documentation: README.md - Full project overview
License
GPLv3 - See LICENSE for details.