Micro-ESPectre
R&D Platform for Wi-Fi CSI Motion Detection - Pure Python implementation for MicroPython
Micro-ESPectre is the research and development platform of the ESPectre project, designed for fast prototyping, algorithm experimentation, and academic/industrial research. It implements the core motion detection algorithms in pure Python, enabling rapid iteration without compilation overhead.
What is Micro-ESPectre?
Micro-ESPectre implements the ESPectre motion-detection algorithms entirely in Python and serves as the innovation lab where new approaches and parameters are developed and validated before being migrated to the production ESPHome component.
Role in the ESPectre Ecosystem
Micro-ESPectre is part of a two-platform strategy:
| Platform | Purpose | Target Users |
|---|---|---|
| ESPectre (C++) | Production deployment | Smart home users, Home Assistant |
| Micro-ESPectre (Python) | R&D and prototyping | Researchers, developers, academics |
Why MQTT instead of Native API? Micro-ESPectre uses MQTT for maximum flexibility - it's not tied to Home Assistant and can integrate with: - Industrial systems (SCADA, PLCs, factory automation) - Academic research (data collection, algorithm validation) - Custom applications (any MQTT-compatible platform)
Innovation Flow
┌─────────────────────────────────────────────────────────────┐
│                    INNOVATION CYCLE                         │
├─────────────────────────────────────────────────────────────┤
│  Micro-ESPectre (Python)          ESPectre (ESPHome)        │
│  ┌─────────────────────┐          ┌─────────────────────┐   │
│  │ • Fast prototyping  │ ──────▶  │ • Production ready  │   │
│  │ • Algorithm testing │  Port    │ • Home Assistant    │   │
│  │ • Parameter tuning  │ ──────▶  │ • Native API        │   │
│  │ • Research/academic │          │ • OTA updates       │   │
│  └─────────────────────┘          └─────────────────────┘   │
└─────────────────────────────────────────────────────────────┘
Key Benefits for R&D: - Instant deployment: No compilation, ~5 seconds to update - Easy experimentation: Modify parameters and test immediately - Quick validation: Test algorithms and configurations rapidly - Proven patterns: Validated algorithms flow to production C++ code
What is micropython-esp32-csi?
micropython-esp32-csi is a MicroPython fork that I wrote to expose ESP32's CSI (Channel State Information) capabilities to Python. This fork makes CSI-based applications accessible to Python developers and enables rapid prototyping of WiFi sensing applications.
Comparison with C++ Version (ESPHome)
Feature Comparison
| Feature | ESPHome (C++) | Python (MicroPython) | Status |
|---|---|---|---|
| Motion Detection | |||
| MVS Detector | ✅ | ✅ | Moving Variance Segmentation (default) |
| ML Detector | ✅ | ✅ | Neural Network (experimental) |
| ML Features (12) | ✅ | ✅ | mean, std, max, min, zcr, skewness, kurtosis, entropy, autocorr, mad, slope, delta |
| Calibration (MVS only) | |||
| NBVI | ✅ | ✅ | 12 non-consecutive subcarriers |
| Adaptive Threshold | ✅ | ✅ | P95 × 1.1 of baseline variance |
| Gain Lock | |||
| AGC/FFT Lock | ✅ | ✅ | Hardware gain stabilization (S3/C3/C5/C6) |
| CV Normalization | ✅ | ✅ | Gain-invariant normalization when lock skipped |
| Filters | |||
| Low-Pass | ✅ | ✅ | Butterworth 1st order, 11 Hz cutoff (disabled by default) |
| Hampel | ✅ | ✅ | MAD-based outlier removal (disabled by default) |
| Traffic Generator | |||
| DNS Method | ✅ | ✅ | UDP packets to gateway (default) |
| Ping Method | ✅ | ❌ | ICMP packets (ESPHome only) |
| Configurable Rate | ✅ | ✅ | 1-1000 pps |
| Configuration | |||
| YAML | ✅ | ❌ | ESPHome declarative config |
| MQTT Commands | ❌ | ✅ | Runtime parameter changes |
| Runtime Config | ✅ (via HA) | ✅ (via MQTT) | Different methods |
Performance Comparison
| Metric | ESPHome (C++) | Python (MicroPython) |
|---|---|---|
| Performance | ⭐⭐⭐⭐⭐ | ⭐⭐⭐⭐ |
| Memory Usage | ⭐⭐⭐⭐ | ⭐⭐⭐ |
| Ease of Use | ⭐⭐⭐⭐ | ⭐⭐⭐⭐⭐ |
| Deployment | ⭐⭐⭐⭐ | ⭐⭐⭐⭐⭐ |
| Build Time | ~15 seconds | Instant (no build) |
| Update Time | ~15 seconds (OTA) | ~5 seconds |
| HA Integration | ⭐⭐⭐⭐⭐ (Native) | ⭐⭐⭐ (MQTT) |
For detailed performance metrics (confusion matrix, F1-score, benchmarks), see PERFORMANCE.md.
When to Use Which Version?
Use Micro-ESPectre (Python) if you want: - Quick prototyping and experimentation - Easy deployment and updates (~5 seconds) - Simple Python-based development - MQTT-based runtime configuration
Use ESPectre (ESPHome) if you need: - Native Home Assistant integration (auto-discovery) - Maximum performance and efficiency - Production-grade stability - YAML-based configuration
Requirements
Hardware
- ESP32 with CSI support (ESP32, C3, S3, C6 supported)
- 2.4GHz WiFi router
Software
- MicroPython with esp32-csi module installed
- MQTT broker (Home Assistant, Mosquitto, etc.)
- Python 3.12 (Recommended for deployment scripts, CLI, and analysis tools)
CLI Tool Overview
Micro-ESPectre includes a unified command-line tool called me that simplifies all device operations. This tool will be used throughout the Quick Start guide and beyond.
Main Commands
The me CLI provides these essential commands:
| Command | Description | Usage Example |
|---|---|---|
flash |
Flash MicroPython firmware to device | ./me flash --erase |
deploy |
Deploy Python code to device | ./me deploy |
run |
Run the application | ./me run |
stream |
Stream raw CSI data via UDP | ./me stream --ip 192.168.1.100 |
collect |
Collect labeled CSI data for ML training | ./me collect --label baseline --duration 10 |
verify |
Verify firmware installation | ./me verify |
ui |
Open web monitoring interface in browser | ./me ui |
| (interactive) | Interactive MQTT control | ./me |
Key Features
- Auto-detection: Automatically detects serial port and chip type
- Fast deployment: Updates code in ~5 seconds (no compilation)
- Simple syntax: Intuitive commands for all operations
- Manual override: Specify port/chip manually if needed
Example workflow:
./me flash --erase    # Flash firmware (first time only)
./me deploy           # Deploy code
./me run              # Run application
./me                  # Interactive MQTT control

# For real-time CSI streaming (gesture detection, research)
./me stream --ip 192.168.1.100  # Stream to PC
Note: The interactive mode (
./mewithout arguments) provides advanced MQTT control features and is covered in detail in the Interactive CLI (Advanced) section.
Quick Start
Get started in just 6 simple steps - no compilation required!
0. Setup Python Environment
If you've already set up the main ESPectre project, you can reuse that virtual environment. Otherwise, create a new one:
# Clone the repository
git clone https://github.com/francescopace/espectre.git
cd espectre/micro-espectre

# Create and activate virtual environment
python3 -m venv venv
source venv/bin/activate  # On macOS/Linux
# venv\Scripts\activate   # On Windows

# Your prompt should now show (venv) prefix
Why use a virtual environment? - Isolates project dependencies from system Python - Prevents version conflicts with other projects - Makes the project portable and reproducible
Note: Remember to activate the virtual environment (source venv/bin/activate) every time you open a new terminal session to work with this project.
1. Install Dependencies
# Install Python dependencies (venv should be active)
pip install -r requirements.txt
This installs all required tools including esptool (for flashing firmware) and mpremote (for deploying code).
2. Flash MicroPython Firmware
⚠️ Required for first-time setup (only once per device)
The precompiled firmware with CSI support is automatically downloaded from micropython-esp32-csi releases.
Auto-detect mode (recommended - detects port and chip automatically):
./me flash --erase
The CLI will: - Auto-detect your serial port - Auto-detect your chip type - Download the correct firmware (cached locally) - Flash it to your device
Manual mode (if auto-detect fails):
# Specify chip and/or port manually
# Supported chips: esp32, c3, s3, c6
./me flash --chip s3 --port /dev/ttyUSB0 --erase
Verify the installation:
./me verify
3. Configure WiFi and MQTT
# Create configuration file
cp src/config_local.py.example src/config_local.py

# Edit with your credentials
vi src/config_local.py  # or use your preferred editor
Update these settings:
WIFI_SSID = "YourWiFiSSID"
WIFI_PASSWORD = "YourWiFiPassword"
MQTT_BROKER = "homeassistant.local"  # or IP address
MQTT_USERNAME = "mqtt"
MQTT_PASSWORD = "mqtt"
4. Deploy and Run
# Deploy code (auto-detect port)
./me deploy

# Run application (auto-detect port)
./me run
That's it! The device will now: - Connect to WiFi - Connect to MQTT broker - Start publishing motion detection data - Automatically calibrate subcarriers (NBVI algorithm)
5. Monitor and Control
Option A: Interactive CLI (MQTT control)
./me
Option B: Home Assistant
Add to your configuration.yaml:
mqtt:
  binary_sensor:
    - name: "ESPectre Motion"
      state_topic: "home/espectre/node1"
      value_template: "{{ value_json.state }}"
      payload_on: "motion"
      payload_off: "idle"
      device_class: motion
Project Structure
micro-espectre/
├── data/                      # Collected CSI datasets (.npz files)
├── firmware/                  # Downloaded firmware cache (gitignored)
├── src/                       # Main package
├── tests/                     # Pytest test suite
├── tools/                     # Analysis and optimization tools
├── requirements.txt           # Python dependencies
├── espectre-monitor.html      # Web Monitor: real-time analysis & configuration
├── espectre-theremin.html     # Audio sonification tool (experimental)
├── me                         # Unified CLI tool (flash/deploy/run/stream/collect/MQTT)
├── ML_DATA_COLLECTION.md      # Guide for ML data collection
├── .gitignore                 # Git ignore rules
└── README.md                  # This file
Key Files
me: Main CLI tool for flashing firmware, deploying code, running app, streaming, collect, and MQTT controlfirmware/: Downloaded firmware cache (auto-created on first flash)src/: Core Python implementation of motion detection algorithmssrc/csi_streamer.py: UDP streaming module for real-time CSI datatests/: Pytest test suite for all core modulestools/: Analysis scripts for algorithm development and validationtools/csi_utils.py: CSI utilities (receiver, collector, detectors) for PC-side processingML_DATA_COLLECTION.md: Guide for collecting labeled CSI datasets for ML
Testing
Micro-ESPectre includes a comprehensive test suite using pytest.
Running Tests
# Activate virtual environment
source venv/bin/activate

# Run all tests
pytest tests/ -v

# Run with coverage
pytest tests/ -v --cov=src --cov-report=term-missing

# Run specific test file
pytest tests/test_filters.py -v

# Run specific test class or function
pytest tests/test_segmentation.py::TestStateMachine -v
Test Suites
| Suite | Type | Data | Focus |
|---|---|---|---|
test_config |
Unit | — | Configuration constants, guard bands |
test_filters |
Unit | Synthetic | Hampel, low-pass filters |
test_features |
Unit | Synthetic | Feature extraction (entropy, skewness, kurtosis) |
test_segmentation |
Unit | Synthetic | MVS state machine, variance calculation |
test_segmentation_additional |
Unit | Synthetic | Additional segmentation edge cases |
test_nbvi_calibrator |
Unit | Real | NBVI subcarrier selection |
test_ml_detector |
Unit | Real | ML detector, features, inference |
test_ml_inference |
Unit | Real | ML inference matches C++ reference |
test_mqtt |
Unit | Synthetic | MQTT handler and commands |
test_traffic_generator |
Unit | Synthetic | Rate limiting, error handling |
test_running_variance |
Unit | Synthetic | O(1) vs two-pass variance comparison |
test_optimization_equivalence |
Unit | Synthetic | Optimization correctness |
test_validation_real_data |
Integration | Real | End-to-end with real CSI data |
CI Integration
Tests run automatically on every push/PR via GitHub Actions. See .github/workflows/ci.yml.
Configuration
All configuration is in config.py. The detection pipeline follows this order:
Boot → Gain Lock → Calibration → Detection Loop (with optional filters)
1. Gain Lock (Hardware Stabilization)
Locks AGC/FFT gain values for stable CSI amplitudes.
GAIN_LOCK_MODE = "auto"       # "auto", "enabled", or "disabled"
GAIN_LOCK_MIN_SAFE_AGC = 30   # Minimum safe AGC (used in auto mode)
| Mode | Description |
|---|---|
auto (default) |
Lock gain, skip if signal too strong (AGC < 30). Uses CV normalization when skipped. |
enabled |
Always force gain lock (may freeze if too close to AP) |
disabled |
Never lock gain. Uses CV normalization for stable detection. |
2. Detection Algorithm
Choose the motion detection algorithm.
DETECTION_ALGORITHM = "mvs" # "mvs" (default) or "ml"
| Algorithm | Method | Calibration | Boot Time |
|---|---|---|---|
| MVS (default) | Moving Variance Segmentation of Turbulence | Subcarriers + Threshold | ~10s |
| ML | Neural Network (12 features → MLP) | None (fixed subcarriers) | ~3s |
3. Calibration Algorithm (MVS only)
Selects which subcarriers to use for detection.
CALIBRATION_ALGORITHM = "nbvi" # NBVI is the sole calibration algorithm
| Algorithm | Selection | Best For |
|---|---|---|
| NBVI | 12 non-consecutive subcarriers | Spectral diversity, resilient to interference |
4. Detection Parameters (MVS only)
SEG_THRESHOLD = "auto"     # "auto" (adaptive), "min" (max baseline), or 0.0-10.0
SEG_WINDOW_SIZE = 75       # Moving variance window (10-200 packets)
5. Filters (Optional, MVS and ML)
Applied to turbulence values before motion detection. Both MVS and ML detectors support these filters.
# Low-pass filter (reduces high-frequency noise)
ENABLE_LOWPASS_FILTER = False
LOWPASS_CUTOFF = 11.0          # Cutoff frequency in Hz

# Hampel filter (outlier/spike removal)
ENABLE_HAMPEL_FILTER = False
HAMPEL_WINDOW = 7
HAMPEL_THRESHOLD = 4.0
For detailed parameter tuning, see TUNING.md.
Published Data (MQTT Payload)
The system publishes JSON payloads to the configured MQTT topic (default: home/espectre/node1):
{
  "movement": 0.0234,            // Current moving variance
  "threshold": 1.0,              // Current threshold
  "state": "idle",               // "idle" or "motion"
  "packets_processed": 100,      // Packets since last publish
  "packets_dropped": 0,          // Packets dropped since last publish
  "pps": 105,                    // Packets per second (calculated with ms precision)
  "timestamp": 1700000000        // Unix timestamp
}
Analysis Tools
The tools/ directory contains Python scripts for CSI data analysis and algorithm validation.
See tools/README.md for complete script documentation.
Automatic Subcarrier Selection
Micro-ESPectre implements automatic subcarrier selection using the NBVI (Normalized Band Variance Index) algorithm:
- NBVI: Selects 12 non-consecutive subcarriers based on baseline variability index
Both algorithms achieve high performance (>90% recall, <15% FP rate) with zero manual configuration.
⚠️ IMPORTANT: Keep the room quiet and still after device boot during calibration: - MVS: ~10 seconds (gain lock + band calibration) - ML: ~3 seconds (gain lock only, no band calibration needed)
For complete algorithm documentation, see ALGORITHMS.md.
Machine Learning
Micro-ESPectre includes a neural network-based motion detector as an experimental feature.
ML Detector (Experimental)
The ML detector (DETECTION_ALGORITHM = "ml") is a compact MLP trained on real CSI data. It extracts 12 statistical features from turbulence patterns and outputs a motion probability.
| Aspect | Details |
|---|---|
| Architecture | MLP (12 → 16 → 8 → 1) |
| Input | 12 features from 75-packet window |
| Output | Probability (0.0 - 1.0), threshold at 0.5 |
| Filters | Supports low-pass and Hampel filters (same as MVS) |
| Performance | See PERFORMANCE.md for per-chip results |
Documentation: - ALGORITHMS.md - Architecture, features, performance - ML_DATA_COLLECTION.md - Data collection, training, usage
Future ML Applications (Roadmap 3.x)
The ML infrastructure enables advanced features planned for future releases:
- Gesture recognition
- Human Activity Recognition (HAR)
- People counting
- Localization and tracking
Standardized Wi-Fi Sensing (IEEE 802.11bf) (click to expand)
Currently, only a limited number of Wi-Fi chipsets support CSI extraction, which restricts hardware options for Wi-Fi sensing applications. However, the **IEEE 802.11bf (Wi-Fi Sensing)** standard should significantly improve this situation by making CSI extraction a standardized feature. ### IEEE 802.11bf - Wi-Fi Sensing The **802.11bf** standard was **[officially published on September 26, 2025](https://standards.ieee.org/ieee/802.11bf/11574/)**, introducing **Wi-Fi Sensing** as a native feature of the Wi-Fi protocol. Main characteristics: - **Native sensing**: Detection of movements, gestures, presence, and vital signs - **Interoperability**: Standardized support across different vendors - **Optimizations**: Specific protocols to reduce overhead and power consumption - **Privacy by design**: Privacy protection mechanisms integrated into the standard - **Greater precision**: Improvements in temporal and spatial granularity - **Existing infrastructure**: Works with already present Wi-Fi infrastructure ### Adoption Status (2025) **Market**: The Wi-Fi Sensing market is in its early stages and is expected to experience significant growth in the coming years as the 802.11bf standard enables native sensing capabilities in consumer devices. **Hardware availability**: - ⚠️ **Consumer routers**: Currently **there are no widely available consumer routers** with native 802.11bf support - 🏢 **Commercial/industrial**: Experimental devices and integrated solutions already in use - 🔧 **Hardware requirements**: Requires multiple antennas, Wi-Fi 6/6E/7 support, and AI algorithms for signal processing **Expected timeline**: - **2025-2026**: First implementations in enterprise and premium smart home devices - **2027-2028**: Diffusion in high-end consumer routers - **2029+**: Mainstream adoption in consumer devices ### Future Benefits for Wi-Fi Sensing When 802.11bf is widely adopted, applications like this project will become: - **More accessible**: No need for specialized hardware or modified firmware - **More reliable**: Standardization ensures predictable behavior - **More efficient**: Protocols optimized for continuous sensing - **More secure**: Privacy mechanisms integrated at the standard level - **More powerful**: Ability to detect even vital signs (breathing, heartbeat) **Perspective**: In the next 3-5 years, routers and consumer devices will natively support Wi-Fi Sensing, making projects like this implementable without specialized hardware or firmware modifications. This will open new possibilities for smart home, elderly care, home security, health monitoring, and advanced IoT applications. **For now**: Solutions like this project based on **ESP32 CSI API** remain the most accessible and economical way to experiment with Wi-Fi Sensing.Interactive CLI (Advanced)
Beyond the basic commands covered in the CLI Tool Overview, the me tool provides an interactive mode for advanced device control and monitoring via MQTT.
Prerequisites: Make sure you have completed the Python Environment Setup before using the CLI.
Usage
# Make sure virtual environment is active
# (your prompt should show (venv) prefix)
# If not: source venv/bin/activate  # On macOS/Linux

# Run the interactive CLI:
./me

# Connect to specific broker
./me --broker 192.168.1.100 --port-mqtt 1883

# With authentication
./me --broker homeassistant.local --username mqtt --password mqtt
Features
- Interactive prompt with autocompletion (TAB) and history search (Ctrl+R)
- All MQTT commands available (see table below)
- Web UI launcher:
webuicommand opensespectre-monitor.htmlin browser - YAML-formatted responses for easy reading
- Environment variables support via
.envfile
CLI-Only Commands
| Command | Description |
|---|---|
webui |
Open web monitor in browser |
clear |
Clear screen |
help |
Show all commands |
about |
Show about information |
exit |
Exit CLI |
Web Monitor
Micro-ESPectre includes a powerful Web-based monitoring dashboard for real-time analysis and configuration. This tool is essential for parameter tuning, algorithm validation, and live visualization of motion detection.
Features
| Feature | Description |
|---|---|
| MQTT Connection | Direct WebSocket connection to your MQTT broker |
| Device Info | View device model, IP, MAC, WiFi protocol, bandwidth, and channel |
| Live Configuration | Adjust detection parameters (response speed, threshold) in real-time |
| Real-Time Chart | Live visualization of movement, threshold, packets/sec, and dropped packets |
| Runtime Statistics | Memory usage, loop timing, and Traffic Generator diagnostics |
| Factory Reset | Reset device to default configuration and re-calibrate |
Screenshots
Real-Time Chart View
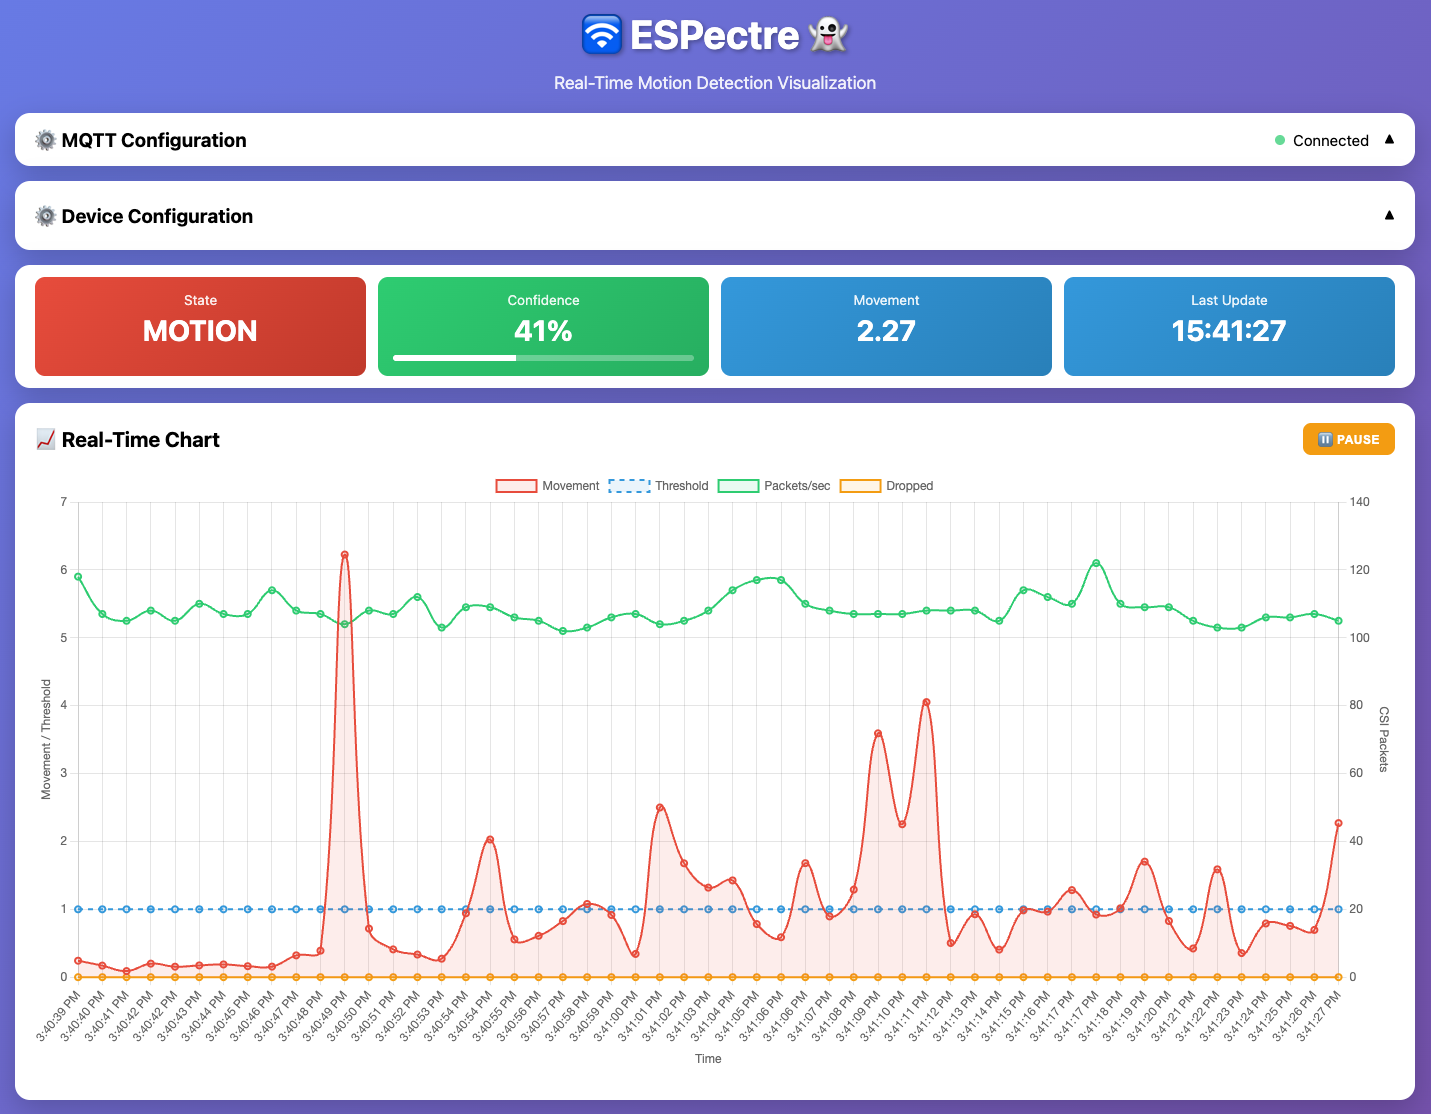
The dashboard displays: - State: Current detection state (MOTION in red, IDLE in green) - Movement: Current moving variance value - Last Update: Timestamp of last MQTT message
The chart shows: - Movement (red line): Current moving variance output - Threshold (dashed blue): Detection threshold level - Packets/sec (green): CSI packet rate from traffic generator - Dropped (orange): Dropped packets count
Configuration Panel
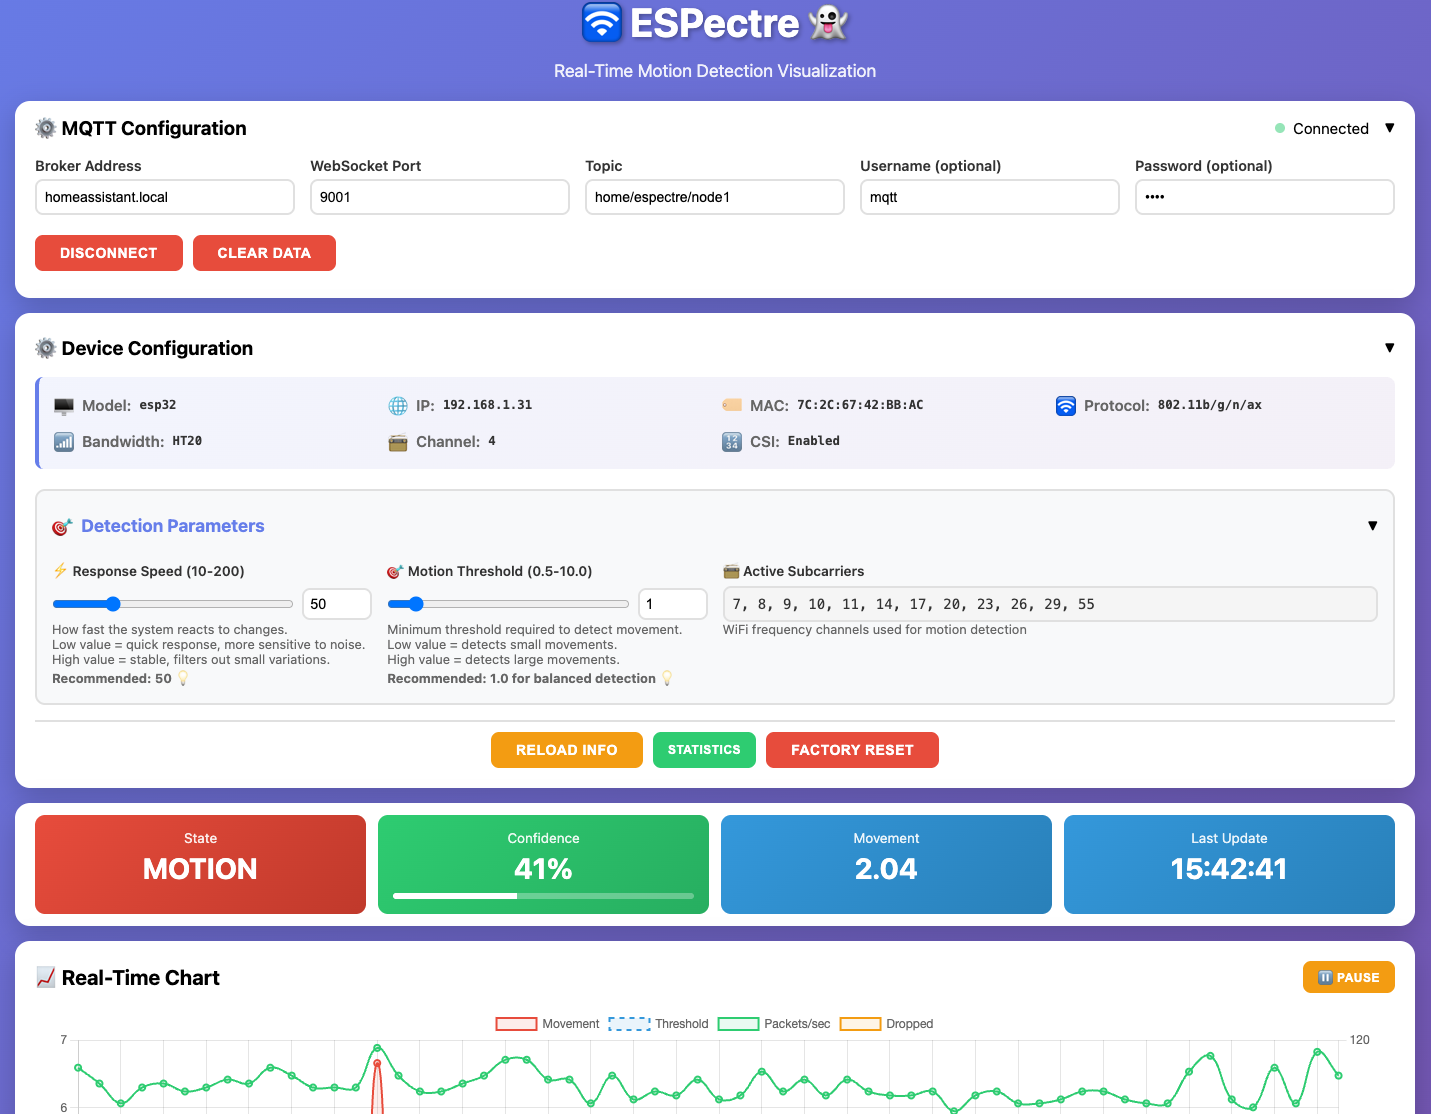
Device Configuration section shows: - Model, IP address, MAC address, WiFi protocol - Bandwidth (HT20), Channel, CSI status
Detection Parameters (adjustable via sliders): - Response Speed (10-200): How fast the system reacts to changes (window size) - Motion Threshold (0.5-10.0): Minimum threshold to detect movement - Active Subcarriers: WiFi frequency channels used for detection
Action Buttons: - RELOAD INFO: Refresh device information - STATISTICS: View runtime statistics - FACTORY RESET: Reset device to default configuration
Usage
Launch from CLI (recommended):
./me          # Start interactive mode
webui         # Open web monitor in browser
The CLI automatically serves the HTML file and opens it in your default browser.
Manual launch:
Open micro-espectre/espectre-monitor.html directly in your browser and configure the MQTT connection manually.
Browser Compatibility
⚠️ Chrome Users: If MQTT WebSocket connection fails, you need to enable local network WebSocket access: 1. Open
chrome://flags/#local-network-access-check-websockets2. Set to "Enabled" 3. Restart ChromeThis is required because Chrome blocks WebSocket connections to private network addresses (like
homeassistant.local) by default.
Additional Tools
espectre-theremin.html: Audio sonification of CSI data (experimental) - converts motion data to sound for auditory feedback
MQTT Integration
Micro-ESPectre uses MQTT for communication with Home Assistant and runtime configuration.
Note: The main ESPectre component (ESPHome) uses Native API instead of MQTT for Home Assistant integration. Micro-ESPectre retains MQTT support for flexibility and compatibility with non-Home Assistant setups.
Available MQTT Commands
Publish JSON commands to home/espectre/node1/cmd:
| Command | Example Payload | Description |
|---|---|---|
info |
{"cmd": "info"} |
Get system information (network, device, config) |
stats |
{"cmd": "stats"} |
Get runtime statistics (memory, state, metrics) |
segmentation_threshold |
{"cmd": "segmentation_threshold", "value": 1.5} |
Set detection threshold (0.0-10.0) |
segmentation_window_size |
{"cmd": "segmentation_window_size", "value": 100} |
Set window size (10-200 packets) |
factory_reset |
{"cmd": "factory_reset"} |
Reset to defaults and re-calibrate |
Command Responses
info command returns system information:
{
  "network": {
    "ip_address": "192.168.1.28",
    "mac_address": "7C:2C:67:42:BB:AC",
    "channel": {"primary": 4, "secondary": 0},
    "band_mode": "2g-only",
    "protocol": "802.11b/g/n/ax",
    "bandwidth": "HT20",
    "csi_enabled": true,
    "traffic_generator_rate": 100
  },
  "device": {"type": "esp32"},
  "mqtt": {
    "base_topic": "home/espectre/node1",
    "cmd_topic": "home/espectre/node1/cmd",
    "response_topic": "home/espectre/node1/response"
  },
  "segmentation": {"threshold": 1.0, "window_size": 75},
  "subcarriers": {"indices": [6, 9, 10, 15, 18, 19, 30, 33, 36, 40, 49, 52]}
}
stats command returns runtime statistics:
{
  "timestamp": 1733250000,
  "uptime": "2h 15m 30s",
  "free_memory_kb": 8090.2,
  "loop_time_ms": 0.97,
  "state": "idle",
  "turbulence": 1.8608,
  "movement": 0.0824,
  "threshold": 1.0,
  "traffic_generator": {
    "running": true,
    "target_pps": 100,
    "actual_pps": 99.8,
    "avg_loop_ms": 1.25,
    "packets_sent": 125000,
    "errors": 0
  }
}
free_memory_kb: Available heap memory (higher on S3 with PSRAM ~8MB)loop_time_ms: Main loop execution time in milliseconds (the smaller, the better)traffic_generator: Traffic generator diagnosticsrunning: Whether the generator is activetarget_pps: Configured packets per secondactual_pps: Actual packets per second achievedavg_loop_ms: Average loop time (should be ≤10ms for 100pps)packets_sent: Total packets sent since starterrors: Socket errors count
Runtime Configuration
Configuration changes made via MQTT commands are session-only and reset on reboot. The adaptive threshold is recalculated automatically at each boot for optimal performance.
Home Assistant Integration
For seamless Home Assistant integration with auto-discovery, consider using the main ESPectre ESPHome component instead.
However, if you need to integrate Micro-ESPectre with Home Assistant, you can do it via MQTT.
Add these sensors to your configuration.yaml:
mqtt:
  sensor:
    - name: "ESPectre Movement"
      state_topic: "home/espectre/node1"
      value_template: "{{ value_json.movement }}"
      unit_of_measurement: ""

    - name: "ESPectre State"
      state_topic: "home/espectre/node1"
      value_template: "{{ value_json.state }}"

  binary_sensor:
    - name: "ESPectre Motion"
      state_topic: "home/espectre/node1"
      value_template: "{{ value_json.state }}"
      payload_on: "motion"
      payload_off: "idle"
      device_class: motion
References
For scientific references and algorithm documentation, see ALGORITHMS.md.
Related Projects
- ESPectre - Main project with native Home Assistant integration
- micropython-esp32-csi - MicroPython CSI module
License
GPLv3 - See LICENSE for details.
Author
Francesco Pace
Email: francesco.pace@espectre.dev
LinkedIn: linkedin.com/in/francescopace